
Table of content
- What you should know about the domain name?
- How to buy a domain name for my Shopify store?
- How to connect the existing domain name to my Shopify store?
- Can I change the domain name of my Shopify store?
- Final thoughts
What you should know about the domain name?
Domain name it’s the address of your website on the Internet.
According to the official statistics, there are over 350 million registered domains. Therefore, if you want your customers to remember and find you without problems, your domain name should be as simple and memorable as possible. So, it sometimes takes hours or even days to select the domain name for the store, website, blog, etc.
There are a few recommendations that can help you to choose a good address:
- Simple and short. Avoid long and difficult-to-pronounce names. It will be easier to remember a short and simple domain name.
- No digits. Usually, it’s better to use words. However, if you have digits in the name of your brand, surely you can use them in your domain.
So, your decision was to make a Shopify store. Let us show you how you can buy, connect, or change domain names. Below you will find our step-by-step instructions.
How to buy a domain name for my Shopify store?
So, you created a store on the Shopify platform. Now you need to assign it an address. In other words – you need to buy a domain name. By default, you will get a myshopify domain. It looks like my-store.myshopify.com. You can buy a new, change it, or use an existing domain.
Buy domain via website admin
So, firstly, let’s consider the situation when you need to buy a domain by using the Shopify website admin. Follow these simple instructions:
- Open the admin of your Shopify store.
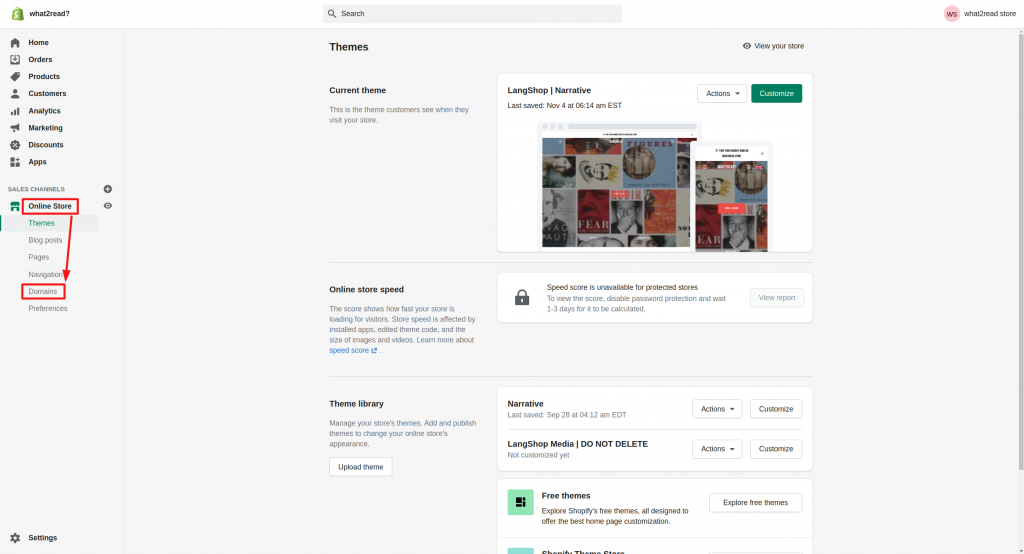
2. On the left side, you will see the menu where you should open the Online Store section.
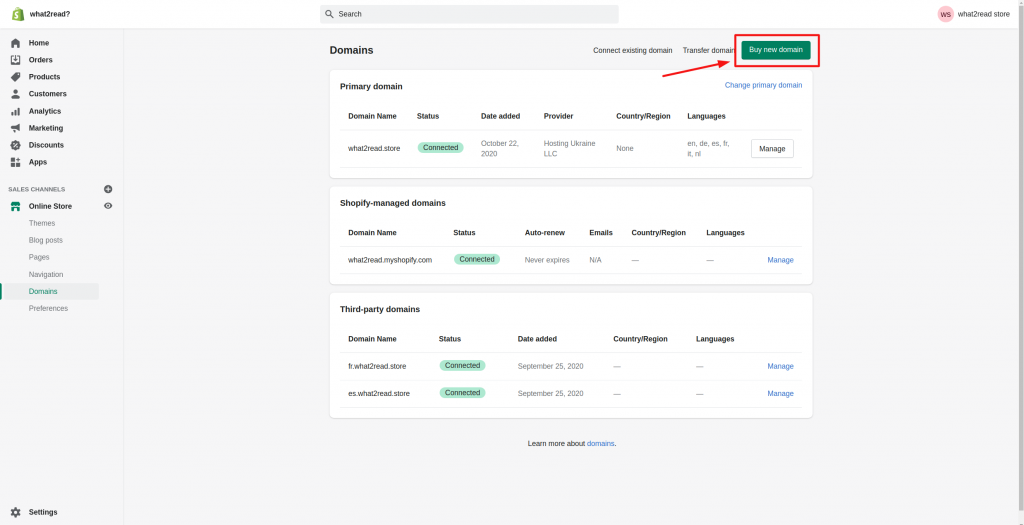
3. In the opened menu click on Domains.

4. Click on the Buy new domain on the upper right corner of the page.
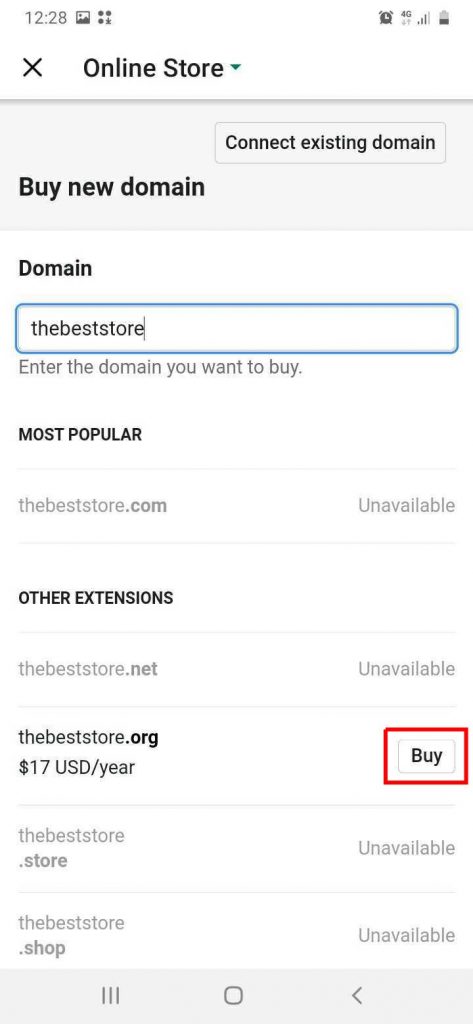
5. Now you should add the domain name that you want. For example, I want to create the domain name books-for-soul. I enter this text into the search field.
6. The system will display available domain names that you can buy. Choose the most appropriate. There are Most Popular and Other Extensions sections. To add the domain name, select it and click Buy near it.
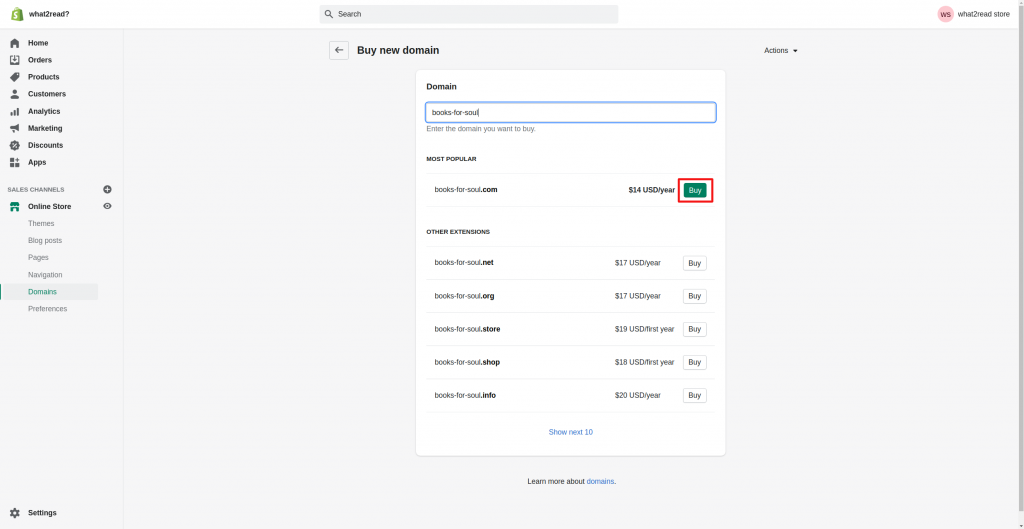
7. Complete the purchase.
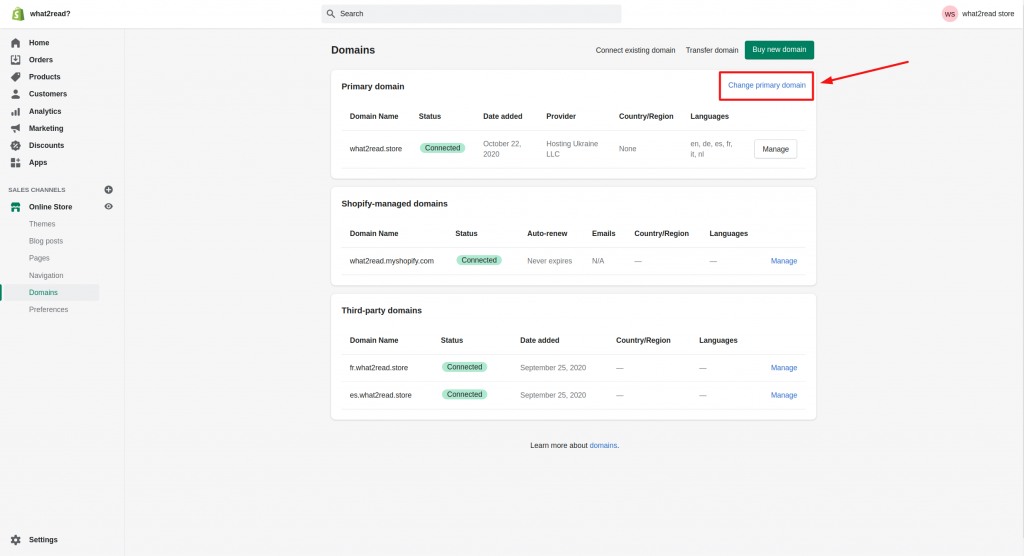
Go back to the Domains page. If the purchase was completed successfully, your domain name will be added to this page. Click on the Change primary domain.
8. Now you need to select the name and Save it.
In the future, you can be able to change it. We will consider this situation in this article below.
Buy domain via the Shopify mobile app (Android and iOS)
The Shopify platform provides a mobile application that allows you to manage your store via iOS or Android mobile devices. So, in this part let’s consider how you can buy a domain by using the mobile app.
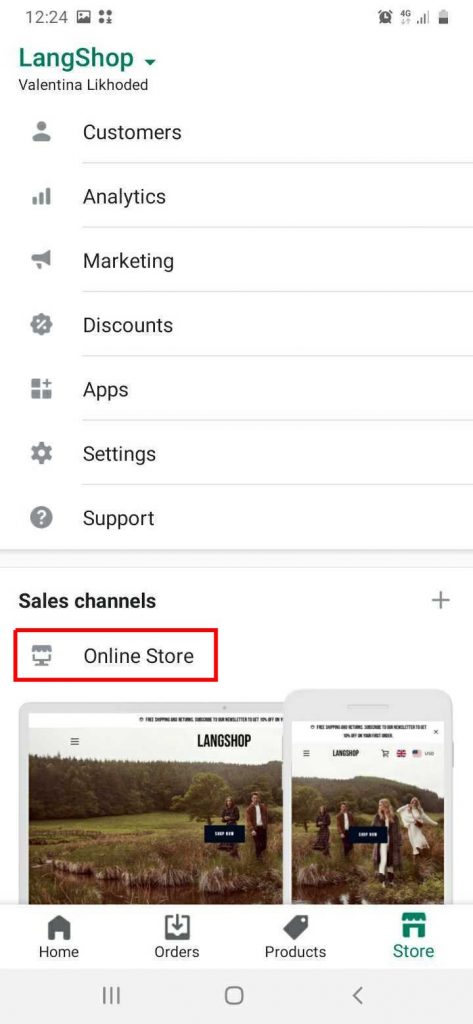
- Firstly, open the app. On the bottom right corner, you see the Store icon. Press it.
2. You see an admin of your store. Find the Sales channels section and press on the Online Store.
3. In the menu choose Domains.
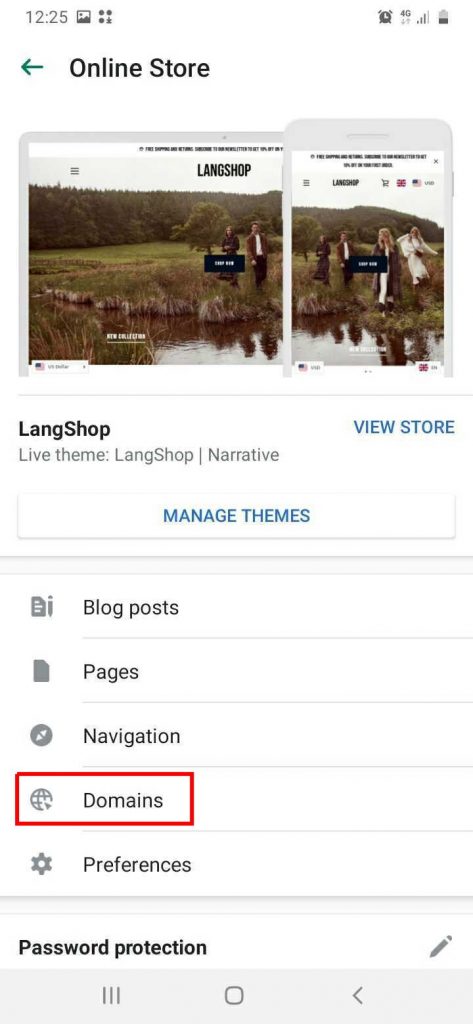
4. There are two buttons. Tap on the Buy new domain button.
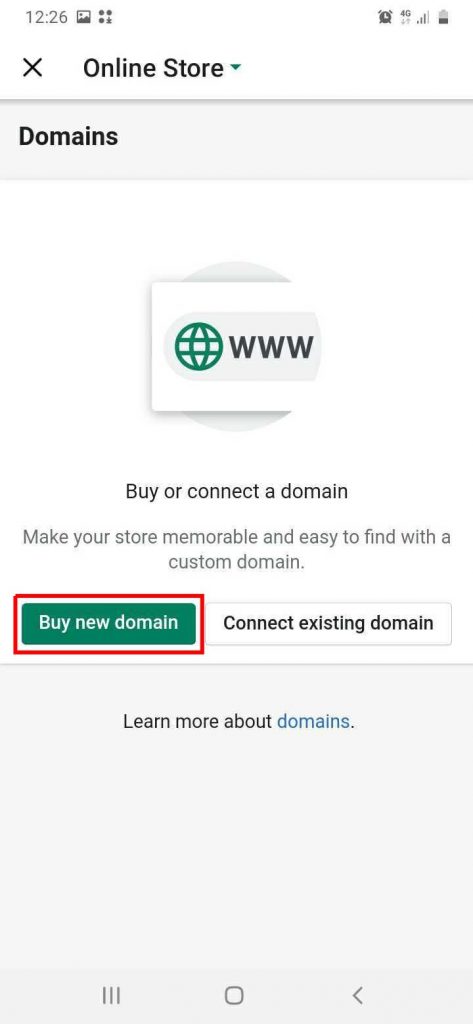
5. In the search field type a domain name that you want. The system will show you available and unavailable variants. If you like the available domain name, just click on Buy.
6. Complete the purchase by adding your payment details.
7. A new domain will be displayed in the Domains section. Go there and click Change primary domain.
8. Choose a new domain and Save changes.
How to connect the existing domain name to my Shopify store?
Now let’s consider the situation where you already have a website and multiple customers. You decided to use the Shopify platform. You can connect your existing domain name to your Shopify store. Therefore, follow the steps from the instructions.
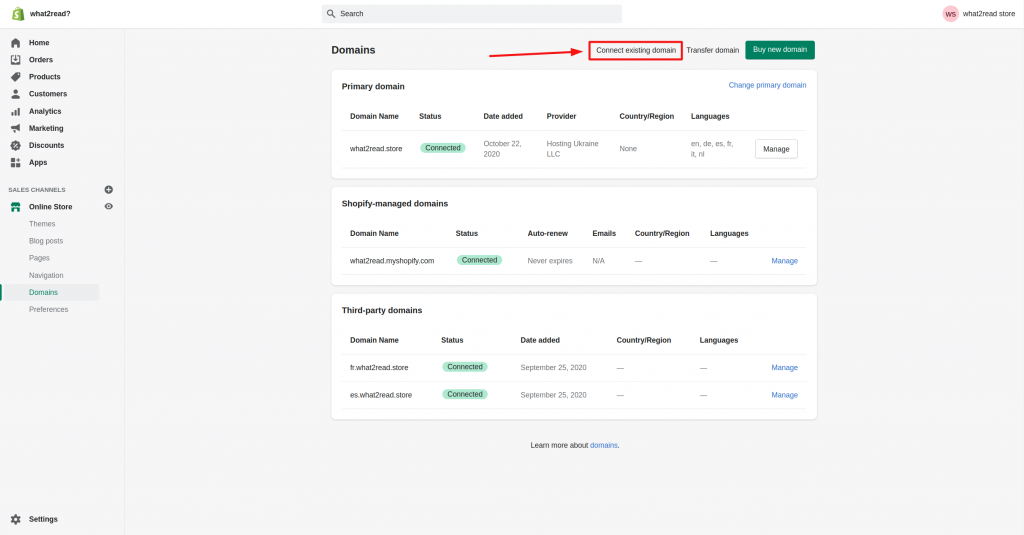
Connect domain via website admin
- Open the admin of your Shopify store.
2. On the left side, you will see the menu where you should open the Online Store section.
3. In the opened menu click on Domains.
4. Click the Connect existing domain.
5. In the appeared window enter the name of your domain and click Next.
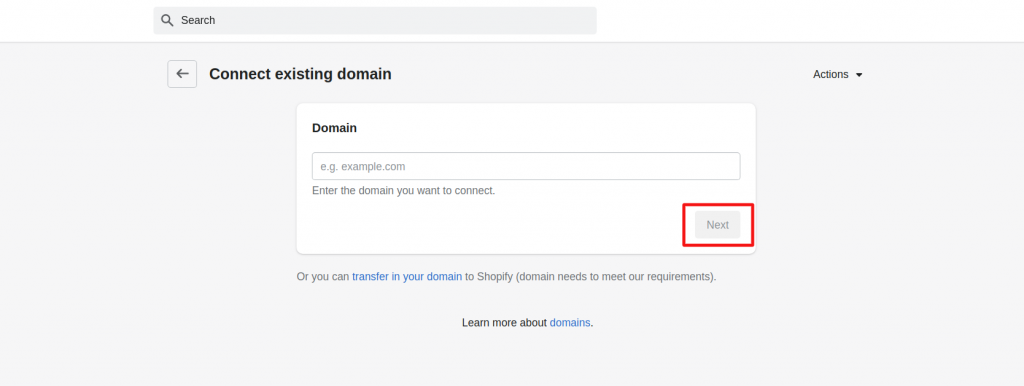
Note, that you can connect your domains automatically if you use the following services: GoDaddy, Google Domains, and 1&1 IONOS. Therefore, when you click Next (as we wrote above), you will see the button Connect automatically. Click on it and the name will be connected.
After that, go to your GoDaddy, Google Domains, or 1&1 IONOS and log in. Click Connect near the domain.
In other cases, you should connect it manually. In the Shopify Help Center, you will find the instruction on How to connect domains manually.
Let’s return to our instruction. On Step 5 you’ve saved the domain name but now you should activate it. To do this you need to change the domain’s DNS settings in order to point to Shopify’s servers. The detailed instruction is available in the Shopify Help Center – How to set up an existing domain to connect to Shopify?
There is also an option that allows transferring domains. The instruction about this feature you can find in the Shopify Help Center – Transferring a domain.
Connect domain via the Shopify mobile app (Android and iOS)
Now, we will show you how to connect domains by using the Shopify mobile application.
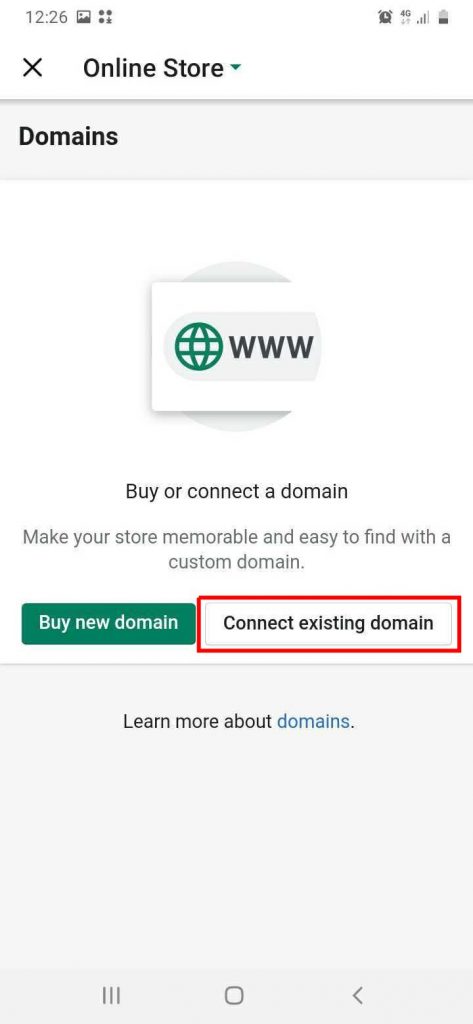
- Inside your Shopify app press the Store icon on the bottom right corner.
2. Find the Sales channels section and press on the Online Store.
3. In the menu choose Domains.
4. There are two buttons. Tap on the Connect existing domain button.
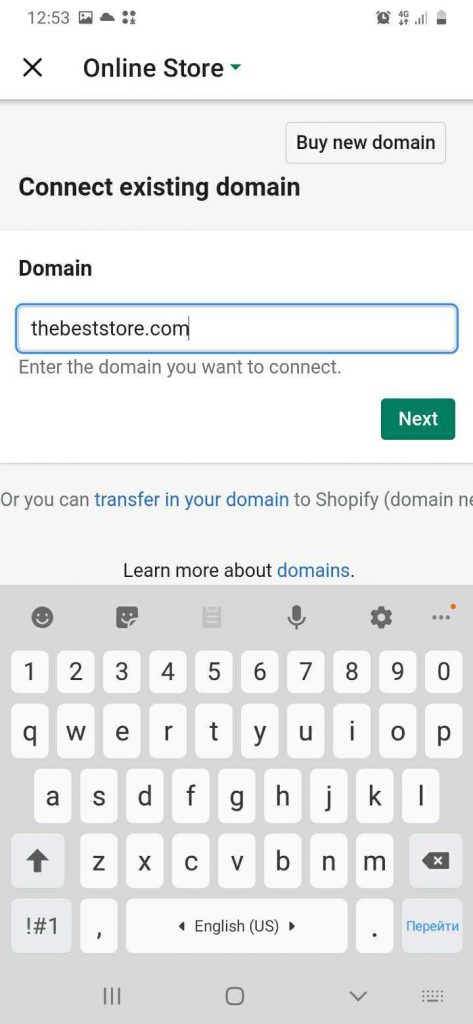
5. In the search field type a domain name that you want to connect and click on Next.
Congratulations! You’ve added the existing domain to the Shopify store. But it doesn’t work. To activate it you need to make a few additional actions with domain DNS settings.
So, go to the dashboard of your domain provider. Choose the domain that you connected to Shopify and click Manage (or Manage Zone, etc. Every provider uses a different name of this option.).
Now you need A and CNAME records. Firstly, edit (or create) an A record and point it to the Shopify IP address 23.227.38.32. Here you also should set the lowest time for TTL (for example, 1 minute).
The next step – edit or create the CNAME record. Now you need to point it to shops.myshopify.com and set the lowest time for TTL as in the previous step. In 48 – 72 hours your domain will be verified. When you get a notification and successful verification, go to the Shopify mobile app => Store icon => Online stores => Domains. Click on Change primary domain and select the name you want to use.
Can I change the domain name of my Shopify store?
In this block let’s consider the situation where you want to change the domain name of your Shopify store. Answering the question in the name of this section – Yes, you can change domain name!
First of all, note that this step is only available in the following situations:
- You have already bought a domain withing Shopify.
- You have connected the existing domain.
So, what should you do? Follow the instruction below and you can do this in a few minutes!
Change domain via website admin
- Open your Shopify admin.
2. On the left side, you will see the Online Store section. Click on it.
3. In the opened menu click on Domains.

4. On the top of the page, you will see different buttons. You should click on the Change primary domain.

5. Now select the domain from the list and click Save.

Your primary domain will be changed immediately. If someday you want to change it again, just repeat the steps described above.
Change domain via the Shopify mobile app (Android and iOS)
- Inside your Shopify app press the Store icon on the bottom right corner.
2. Find the Sales channels section and press on the Online Store.
3. In the menu choose Domains.
4. Change primary domain and choose the name you need to use.
Voula! You’ve successfully changed the domain name.
Final thoughts
In this article, we have considered actions that you can do with domains. For example, you can buy them, connect to the Shopify store, transfer, and change them. We hope these instructions were helpful to you.
Don’t hesitate to leave your comments, feedback, and questions. Our team will gladly communicate with you.


